
A climber's descent guide to Mount Sir Donald
Glacier National Park
This guide provides a description of the descent route and is aimed at experienced mountaineers. It does not describe the various ascent routes. Climbing Mt Sir Donald is a serious undertaking with inherent risks. To successfully summit, parties must climb quickly and efficiently, paying close attention to the weather. Due to Mt Sir Donald’s popularity and the history of accidents, many of which have occurred on the descent, we have prepared this special brochure with detailed information on the descent route to assist you in having a safe climb.
Please note:
Mountain climbing is recognized as an acceptable and encouraged activity within the National Parks. It is accepted practice that fixed hardware such as bolts and pitons (“fixed” meaning that hardware has been left by previous climbing parties) are used for protection and anchors when other options are not available. These anchors are often of varying quality and strength depending upon their age, the materials used and the method and location of placement. Parks Canada maintains that these items do not represent park facilities and leaves the onus on visitors to make the final decision before putting them to use.
General Information

Summit: 3284m
Elevation gain during the climb:
- Trailhead to summit: 1998m
- From Uto-Sir Donald Col (2535m) 713m
Round-trip time from lower bivy site: 3 - 14 hours
Season: Mt. Sir Donald is a summer climb. The route can hold snow well into the summer and conditions are best when the ridge is free of snow, usually by mid-late July.
Restricted Access and Bears:Trail restrictions for the Sir Donald trail may be in place during the summer to protect resident grizzly bears and visitors. When in place you must hike in a tight group of 4 or more on these trails for both the approach and the descent (check with national park visitor centres or call 250-814-5202).
Descent Route Description
The following describes the bolted descent route down the NW ridge of Mt Sir Donald. Alternative descent routes, as well as the various ascent routes are described in David P. Jones’ guidebook, Selkirks South.
There are 15 2-bolt stations, at 25m intervals (one 50m rope required).
Note that there are also numerous sling anchors left behind by previous climbing parties. The onus is on the climber to assess the quality of all anchors prior to use.
Step 1
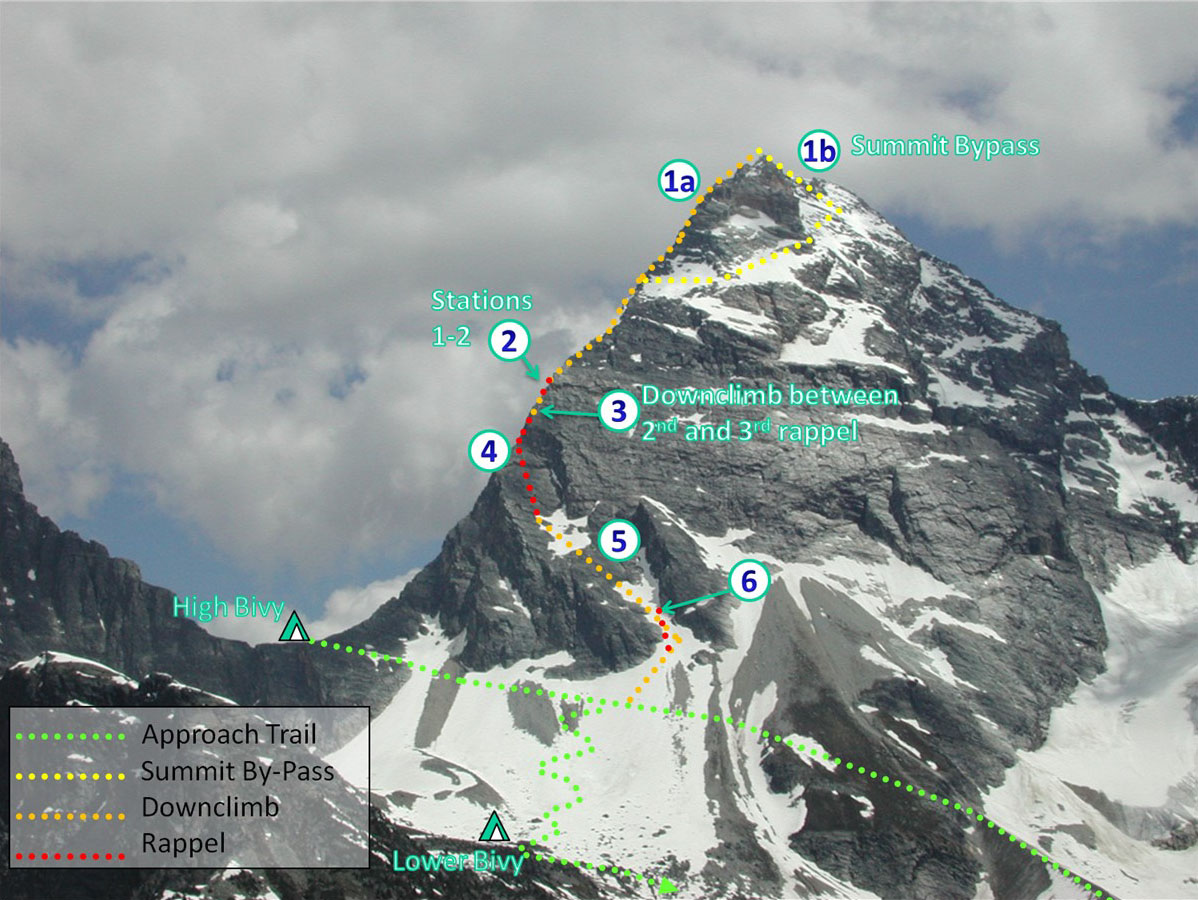
- 1a. The most straight-forward option is to rappel and down-climb the NW ridge from the summit until reaching station 1.
- 1b. If dry, the Summit By-pass may be a faster option but requires good route-finding skills. If snow remains on the route, this option is hazardous and will require ice axe and crampons.
Descend a short distance (~75m) from the summit down the south ridge. Drop off the ridge, working skiers left through a series of ledges down the west face until you can wrap skiers right, below the steep summit block, and back to the NW ridge.
Once on the NW ridge, easy down-climbing leads to the first in the series of bolted rappels stations.
Step 2
Some more down-climbing leads to where the ridge steepens again.
Station 4: The station is right on the ridge, where it steepens. Rappel 25m along ridge to station #5.
Station 5: Rappel ridge 25m to easy down climbing. There is a bolted station (Station 5a) at 25m, but the down climbing is simple and this station can be avoided.
Step 3
Station 6: Rappel 25m along ridge to station #7.
Station 7: Staying on the north side of the ridge, rappel down the ridge and slightly climbers left to station #8 (25m).
Step 4
Step 5
Station 13: Trend climbers left, rappelling towards scree at the base of a narrow gully in the slab.
Scramble down easy scree and ledges to rock slab/snow at the base of the dihedral.Step 6
Essential Information
Parking, Starting and Camping
Mt Sir Donald can be summited in a day from the trailhead, or parties may wish to bivy.
The trailhead for Mt. Sir Donald is located at the end of the Illecillewaet Campground road, approximately 5km west of Rogers Pass. Follow the Sir Donald Trail up into the basin below the Vaux Glacier. Once in the basin, climbers can access the lower bivy site by crossing the Vaux creek above the waterfall, travelling around the base of the steep moraine and following a trail to the lower bivy. Climbers wishing to travel directly to the Uto-Sir Donald Col (also the high bivy site) follow the crest of the moraine to a short gully on the left of the trail leading across the slopes below the west face of Sir Donald to gain the col.Both bivy sites are equipped with food storage lockers (pack out all garbage!) and green-throne style privies. A Wilderness Pass is required to camp in the backcountry and can be acquired at the Rogers Pass Discovery Center or the Illecillewaet Kiosk.
Equipment Considerations
In choosing your equipment consider the following:
- 50 meter+ rope is required for the rappels
- Cell phone– Telus network only. Reception is good along the route, may be poor from the basin below
- If snow remains on the slopes below the Uto– Sir Donald col consider bringing an ice axe ; slopes are steep and can be very hard and icy. In addition, if snow remains on the summit by-pass consider bringing an ice axe and crampons, or descend via the NW ridge from the summit.
- Bring enough water for a long day. There are no water sources above the low bivy site.
- If deciding to store trekking poles while climbing, note that the rappel route does not take you back to the Uto-Sir Donald col
- Bring extra warm, insulating clothing. It is not uncommon for parties to spend the night on the route due to changing weather or underestimating the route.
Climbing and Safety Tips
- Leave a detailed trip plan with a reliable person. Include where you are going, expected return, vehicle description, plate number and location where parked. A Voluntary Safety Registration service is available at the Rogers Pass Discovery Center.
- Start early. Allow yourself the best chance to summit and descend before afternoon thundershowers.
- Assess your progress. To safely and successfully summit, climbers must move quickly and efficiently. If you do not feel comfortable climbing the first few pitches from the col without a belay, consider changing objectives. Consider the southwest ridge of Mt Uto to gain experience on an excellent, but less demanding, route.
- Turn-back time. Turn back at a set time regardless of whether or not you have made it to the summit.
- Mountain weather changes quickly. No matter what the forecast says, always take a backpack with lightweight protective clothing.
- It’s a matter of perspective. Take advantage of opportunities to study your climb from a distance where you will see more of your route. From the highway, take a good look at the summit. If snow remains on the face below, the Summit By-pass option is not recommended on the descent.
- Looking back. As you climb up, note where the rappel anchors are and make a conscious effort to look back and memorize landmarks for the way down. In particular, on the way up note where you pass the first station on the ridge. On your descent, this will be the station where you change direction and begin rappelling down the west face.
- Lightning. Lightning storms are most common on warm afternoons. If you hear an approaching thunderstorm, descend immediately to the safety of lower elevations. If caught in an exposed position: pick a spot away from any dangerous drop, crouch down so your head is not raised above the surrounding terrain, sit on your pack at a distance from any metal belongings, keep your feet together, and try not to touch the ground with any other parts of your body. Do not shelter under overhanging rocks or caves.
- Rockfall. One of the leading causes of accidents is human-generated rockfall. Be aware of other parties on the route, while ascending and descending. Wait until other parties are no longer directly under/above you. Travel more slowly on descent to avoid causing rockfall. If you dislodge a rock, yell “rock” to people below so they have a chance to move out of the way. Wear a helmet!
- Rappelling is a skill. There have been accidents on Sir Donald that resulted from unsafe rappel practices. There are things you can do to make it safer: Use a personal prussic backup. Tie knots at the end of the ropes. Double check that your harness and rappel device are properly attached before committing to them. Check the rope below; is it hung up on anything off to the side? If so, pull it back up and throw it again.
Emergencies
Out Overnight
If your party is detained, you should be prepared to spend at least one night out. Carry spare clothing and high-energy food. If someone is injured, focus most of your resources on conserving their warmth and energy until help arrives.Accidents
If a serious accident occurs, respond with care – avoid rushing.- Stabilize the injured persons. Take measures to protect them from further danger. Provide them with shelter.
- If they require evacuation, call the emergency numbers below or send someone for help. Ideally, leave someone at the scene to care for the patient.
- Ensure the reporting person has all the information including the exact location of the patient, nature of the injuries, and time of the accident.
Emergency number in Glacier National Park: 1-877-852-3100

Request help for a mountain emergency in Glacier National Park.
If a helicopter approaches, proper communication can save critical time. Signal and stay in position (do not wave your arms)
Further Resources
- Visit the Rogers Pass Discovery Center.
- Glacier National Park
- Mountain Safety
- Glacier Visitor Safety Specialists can provide mountaineering advice. Call 250-814-5206.
- Guidebooks available in local bookstores:
- Rogers Pass Alpine Guide by David P. Jones
- Fifty Classic Climbs in North America by Steve Roper & Alan Steck
- Check out the latest Mountain Conditions Reports posted by certified ACMG guides.
- Date modified :